Mturk Jobs

Mturk Jobs
Mturk Jobs

Tank

Friday, December 22, 2017

Arduino Avionics


Today I searched for the existence of Arduino in the world of Aviation and guess what I have found..

I found many websites and projects that take opensource aviation seriously.


Here is a Cambridge postgraduate student who helped design a modular opensource rocket avionics system that consists of modular Disc-Shaped PCB stacks.
Screen Shot 2017-08-20 at 1.08.32 PM

custom-avionics-adam-greig-martlet-thumb


https://hackaday.com/2017/08/21/open-source-modular-rocket-avionics-package/


And this is a website for a project that aims to make general aviation safely available for everyone.

http://makerplane.org/


Open Source Magneto Signal Stabilizer


This website makes it easy for Arduino enthusiasts and hobbyists to make their own Avionics systems using the DIY culture.


http://experimentalavionics.com


Arduino EFIS 

http://experimentalavionics.com/efis-19264/


EFIS prototype board


EFIS screenshot


Thursday, December 14, 2017

OBDuino Arduino Trip Computer

This is an open source car trip computer based on the popular Arduino platform.

It calculates trip information such as fuel consumption, cost, remaining fuel, miles per gallon, miles per tank and also displays OBD parameters.

OBDuino.ca

It first started as of 2008 based on the MPGuino project to get an open source platform for hobbyists to connect to the OBD standard.


Thank you for reading.

Check my books on Amazon


Embedded Systems, Electronics: My Projects Collection From Instructables by [Ebeed, Ahmed]


PC Fan Wind Turbine: How to turn an old PC Fan into a small wind turbine the easy way by [Ebeed, Ahmed]


Saturday, December 9, 2017

Arduino speech recognition

This day I'm using the speech recognition module with Arduino UNO.

My wife has brought me this Arduino Module as my birthday gift. I'll show you how it can be used.


It can be connected to Arduino or to any other Microcontroller through serial port.

It can also be connected to the standard PC through its serial port but through a TTL converter. Since a standard PC serial port sends and receives RS232 signals (+12v and -12 v) but this module handles TTL signals ( 0 and +5 v )


You can control this module through HEX Format commands or through Arduino libraries associated with it.


First, I had to configure it using USB port in my laptop through this FOCA circuit which converts USB signals to TTL signals.


Then I could use Arduino libraries to initialize the module and load it with speech commands.

The module can store up to 80 voice commands. Then it can differentiate between each one and send signals to Arduino upon command recognition.

Friday, December 8, 2017

PS2 Keyboard Bluetooth interface to Android Smartphone

Do you like using the keyboard to record your thoughts and to code?

Have you ever thought of using the normal sized keyboard to type in your Android smartphone?

Can you make an Arduino project that connects your favorite keyboard with your smartphone via Bluetooth connection?

Today I came to the idea and loved it very much.

It's very simple to implement.

Using Arduino mini and HC-06 Bluetooth module and connect them to the PS2 keyboard.

You can then read text from keyboard and send it wirelessly to the smartphone.


Here is the PS2 Connection to Arduino and code for this project.

This project can be found on Arduino platform

https://playground.arduino.cc/Main/PS2Keyboard


And here is the connection for it.


Note:

Make sure you connect the Clock PIN to the digital PIN 3 on the Arduino. Otherwise the interrupt, and therefore the whole library, won't work.

In this project, we used the The PS2Keyboard library.

Usage:

This is sample code;

#include

#define DATA_PIN 4
PS2Keyboard keyboard;

void setup() {
  keyboard.begin(DATA_PIN);

  Serial.begin(9600);
  Serial.println("hi");
  delay(1000);
}

void loop() {
  if(keyboard.available()) {
    byte dat = keyboard.read();
    byte val = dat - '0';

    if(val >= 0 && val <= 9) {
      Serial.print(val, DEC);
    } else if(dat == PS2_KC_ENTER) {
      Serial.println();
    } else if(dat == PS2_KC_ESC) {
      Serial.println("[ESC]");
    } 
  }

}


HC-06 Bluetooth Module to Arduino Mini Connection


HC-06ARDUINO
VCC->+3.3V
GND->GND
TX->2
RX->3


 HC-06 ----- Arduino


VCC   ---   3.3v 


 GND --- GND 


TXD   ---   RXD 


RXD   ---   TXD


Now we can add the stuff together to make our complete project.

PS2 Keyboard

Adruino Mini Pro

HC-06 Bluetooth Module

3.7V Li-Poly Battery

Android Smartphone

Android App : Arduino Bluetooth Control
Arduino Bluetooth Control App


Cover art


Wednesday, December 6, 2017

Bitcoin Mining Using Raspberry Pi

Today I came to search for Arduino Bitcoin Mining but I found that the process of Bitcoin mining requires a huge processing power.


So, instead of being made using software, it's being made using ASIC(dedicated hardware).

Arduino is not a suitable platform for Bitcoin Mining.

But you can use those USB ASIC Mining sticks on PC or on Raspberry Pi


The best part is that using this configuration uses only the power of Raspberry Pi ~ 4 watts plus the power of USB ASIC Miner ~ 2.5 watts. Which is a much lower power of the PC or other ASIC Miner.


Monday, December 4, 2017

PC Fan Wind Sensor with Arduino

You can use an Old PC Fan as a wind sensor as in this project. Yes, you can make an easy anemometer using Arduino and a PC Fan.


In this project, a 3 wire PC fan is used. The third wire comes from a Hall Effect sensor that measures the fan speed.


As the fan rotates, the Hall Effect sensor produces pulses.

The results are sent to the serial monitor.

Here is the code that does the job:

#include 
#include "FanMonitor.h"

// ***
// *** Pins
// ***
#define FAN_MONITOR_PIN 5

// ***
// *** Define the FanMonitor instance to monitor
// *** the 3-wire fan.
// ***
FanMonitor _fanMonitor = FanMonitor(FAN_MONITOR_PIN, FAN_TYPE_BIPOLE);

void setup()
{
  // ***
  // *** Initialize the serial port.
  // ***
  Serial.begin(115200);

  // ***
  // *** Initialize the fan monitor.
  // ***
  _fanMonitor.begin();
}

void loop()
{
  // ***
  // *** Get the fan speed.
  // ***
  uint16_t rpm = _fanMonitor.getSpeed();

  // ***
  // *** Print the speed to the serial port.
  // ***
  Serial.print("Speed = "); Serial.print(rpm); Serial.println(" RPM");
  
  // ***
  // *** Delay 1 second.
  // ***
  delay(1000);
}


I thought of something a little bit different.

I've managed to make a PC Fan wind Turbine by removing the PC Hall Effect sensor and electronic commutator IC and connecting the terminals to the Fan winding.

You can find more details about it here.


By making this connection, I've turned the PC Fan into a small wind turbine that produced about 3-6 Volts in fair wind speed.


The output voltage can light an LED. And it can also be used as an indication for wind speed.


By connecting the output of the modified PC Fan to Arduino Analog Input, we can get an indication for wind speed.


Using Arduino in this project makes monitoring and calibration process very simple and straight forward.

More photos, code and results will be available soon.

Thank you for reading.

Check my books on Amazon


Embedded Systems, Electronics: My Projects Collection From Instructables by [Ebeed, Ahmed]


PC Fan Wind Turbine: How to turn an old PC Fan into a small wind turbine the easy way by [Ebeed, Ahmed]


Saturday, December 2, 2017

16F84A One Bit Sound Generation

I found this topic that uses Microchip PIC16F84A Microcontroller as a One Bit Sound recorder and reproducer.

The sound is recorded and regenerated using BTc (Binary Time Constant) algorithm.


The algorithm is designed to be Microcontroller friendly with the minimum Software and Hardware resources.


It's really impressive how you can use only one bit to reproduce digitally recorded sound using simple hardware with small Microcontroller such as PIC16F84A or any other Microcontroller.


You can find more details on the topic from here

Friday, December 1, 2017

PIC 16F84A Capacitive touch Sensor using minimum hardware

I've previously thought of making a capacitive touch sensor that works as touch switch using the PIC 16F84A Microcontroller.

I had a lamp that works using capacitive touch as a switch and it gave me the idea.

When I worked with the microcontroller and there was some error or bad connection in hardware circuit I noticed that the microcontroller showed irregular behavior during touching it when reading zeros and ones inputs to the GPIOs.

Here's how I got the idea of using the microcontroller as a touch sensor.

I've tried to make the circuit and code it myself but I had unreliable results. I thought that the idea was wrong and would never work.

When I searched for it online I found a video showing how it worked so good. I wanted to share it with you.

I found it on this blog:

http://diytronics.blogspot.com.eg/2011/05/capacitive-touch-sensor-for-pic16f84a.html

I'll try it and will make some modification to it.
I'll also add a photo of my own circuit.


Here is the basic C code that does the job

int freqcapsense(){
    unsigned int avg;
    unsigned int current=0; 
    unsigned int thresh=29;

    unsigned int trials=10;

    while(trials>0){
        TRISA=0b0;
        RA0=1;
        delay();
        TRISA=0b1;
        while(RA0==1){current++;}
        trials--;
        avg=(avg+current)/2;
    }


    if((current-avg)>thresh){return 1;}
    else{return 0;}


    //return current;
}

Here is a video from the maker


The idea is very simple and straight forward.

The code can be applied to any microcontroller with this C language code.

Thank you for reading.


Wednesday, November 29, 2017

16FUSB - Software USB for Module For old PIC 16F628

Some years ago I came across a web site www.lendlocus.com ( no longer exists ) and saved it on my PC so that I can implement the posted project later.

The project was called 16FUSB . Software implementation of USB interface with old cheap Microcontrollers like 16F626.


I really thought of this idea for my favorite 16F84A Microcontroller but couldn't find any real-life implementation for it.

The PIC16F626 is more powerful than PIC16F84A but still is more available and cheaper that Microcontrollers contain built-in USB hardware modules ( such as PIC18F4550 and PIC18F4455).

The project came to be very popular and now is on code.goole.com

https://code.google.com/p/16fusb/


The circuit is very simple.

The software on the PIC


Check out my book about Embedded Systems for beginners on Amazon Kindle 


Tuesday, November 28, 2017

LED as a light sensor using Arduino

Yes, this might not have a practical application so far.

But you can use this amazing concept to spark that geek inside you or just to impress your nerd friends.

I found that concept of using the LED as a light sensor.

The LED has nearly the same hardware structure as the light sensor.

This means that it has the ability to detect light exposure. 

I found that LED can be used as a Light sensing element.

Of course, I cannot assure it can be used in practical application.

But I liked the concept when I knew it.

I've tested the concept both on Arduino and on Pinguino and it just worked well for me.


I followed that setup from instructables


//Copy the following sketch in your Arduino software and upload it to the Arduino board. (be sure to select the right board and com-port in the Arduino software)

int led = 13;                                        // the pin where you will put the LED
int sensorpin = A3;                           // the analog pin where you put your sensorLED
int resetteller = 0;                              // the rest are counters and variables to calculate with
int sens = 0;
int teller = 0;
int basis = 1024;
int test = 1024;
int test2 = 1024;
int test3 = 1024;

// this are the values to play with to get better (or worse) results
int marge = 5;                         // the space between a positive and negative reading
int vertraging = 1;                  // the speed of the readings; a lower number is a higher speed
int samples = 70;                   // the amount of samples to compare to make one reading
int resetsamples = 30;          // how many cycles to run the light on before you don't trust the value anymore

void setup() {
  pinMode(led, OUTPUT);
  Serial.begin(9600);                                   // no real part of the program, just for debugging
  for(teller =0; teller < samples; teller++) {// remember the lowest value out of many readings
   sens = analogRead(sensorpin);
   if (sens < basis){basis = sens;}
   delay(vertraging);                                     // the sensor needs a delay here to catch its breath
  }
}


void loop() {                                          
for(teller =0; teller < samples; teller++) {// remember the lowest value out of many readings
   sens = analogRead(sensorpin);
   delay(vertraging);                                   // the sensor needs a delay here to catch its breath
   if (sens < test){
   test3 = sens;                                            // remember the 3 lowest readings
   test2 = test3;
   test = test2;}
  }
  if (test < basis-marge && test2 < basis-marge && test3 < basis-marge){//all 3 low readings mus be < the basis reading
    digitalWrite(led, HIGH);
    resetteller++;                                         // count how long the LED stays on
  }
    else{
      digitalWrite(led, LOW);
      basis = test;                                         // if the lowest test reading is higher than the basis, basis will be reset
      resetteller = 0;
    }
    if (resetteller > resetsamples){basis = test;}//if LED stays on to long, we don't trust it and reset basis
    Serial.print(basis);Serial.print("  ");Serial.print(test);Serial.print("  ");Serial.println(sens);//just for debugging
    test = 1024;
}


Friday, November 24, 2017

Wind Turbines Made Easy. From passion to reality

This post is not exactly about embedded systems.

Although it’s more about making. Making as a hobby and a global trend. 

My passion for making started with me so early. But I didn’t find a way to monetize this passion until only recently. 

Making for me means the ability to think about something and trying to bring it from idea to a real thing in the real world. 

It may be an electronic circuit, software program, a piece of art or even a wind turbine.

In this case I’ll show how I managed to make my ideas real. And that’s the best part of it. 

You may feel like daydreaming about making something and it just cannot get out of you mind. You don’t feel satisfied until you actually make that thing. 

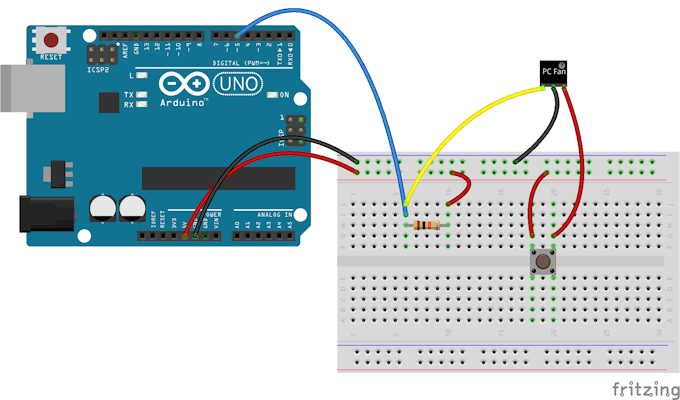
This is exactly what happened with me when I’ve been dreaming of building a wind turbine

I didn’t think of making something big or living off the grid. I couldn’t imagine myself building a 5kw wind turbine that can run some of my household appliance. 

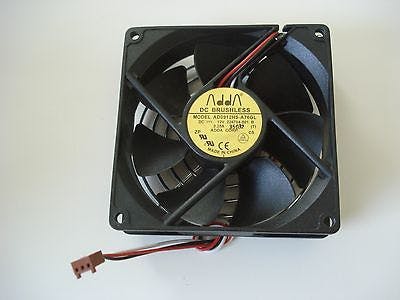
Only I wanted to make a small wind turbine that could light an LED or recharge my cellphone

Just when I saw it on instructables.com and found all those people successfully building their own systems what gave me enough encouragement and motivation to do it. 

It only turned into reality when I first built my first one. It works. It could light that small LED. 


I found myself obsessed with that source of power and couldn’t help except reading about it. And I just had a new passion. 

You know when you succeed in something and you want to get more out of it. That’s what happened when my first wind turbine worked with me. I then wanted to make more and more. 

I found some documentation online. I got myself some material from Amazon and used a lot of scrap parts. 

I recycled many things to make my wind turbines to come. The experience was so encouraging. As I made more small wind turbines I learned something new form each one.


I thought that it is what kids and students would need to begin thinking of designing their own systems

If you are like me, you may not want to live off the grid or make your own Megawatt wind turbine but sure you want to use this breeze of air to make some power out of it. 

It all worked well for me and I made my own wind power phone charger. 

Today, I’m sharing with you what I made and put it all in one book.

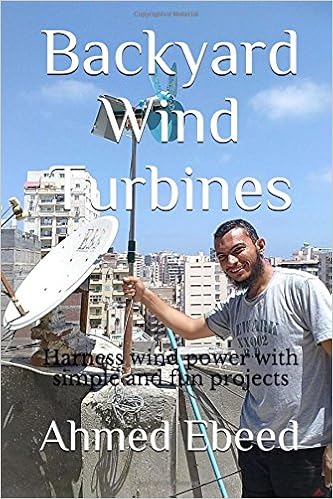
Backyard Wind Turbines: Harness Wind Power with Simple and Fun Projects


It’s available on Amazon and it has made a huge success from the first day of its launch. 

I hope you like it.

Thank you for reading.

Tank