Embedded systems design, Microchip PIC , Microcontroller , Electronics , Software , Computer , PC,Embedded Systems in Egypt , Microcontroller companies in Egypt , Microcontroller Tutorial for beginners, Microchip Microcontrollers tutorial , Microcontrollers made easy, Microcontroller DIY, DIY,embedded systems,embedded system , open source embedded software,list of embedded systems companies in Egypt, Quadcopter , Embedded Systems components in Egypt , Embedded Systems Components Stores in Egypt
I still remember the old days of early embedded systems kits and board. Those days where you had to make your own chips programming circuits because they were hard to find and too expensive.
You also had to wire your programmer on the circuit and then connect it to the PC using Parallel or Serial Ports. When things got advanced, those Parallel and Serial Ports became hard to find. Even ready made programmers and DIY programmers started to be pain in the neck as they only worked with legacy technology PCs and Laptops.
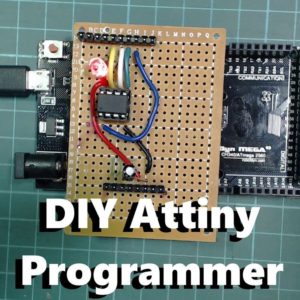
Then the next generation of programmers came and it supported the more advanced USB ports. Now you can program any chip with your USB programmer. And then came the Arduino. It started a new age of embedded systems. New kits were introduced and there became new way of programming embedded chips. Arduino made life much easier. Now you can make a DIY programmer for virtually any Microcontroller chip you like. Just build the circuit, connect it to Arduino and then program your chip at once. You can even make your circuit in Arduino Shield form that can fit on top of one of Arduino boards. Here is how you can program Attiny Microcontroller and make it a standalone Arduino on a chip. This Microcontroller as you know is from Atmel family and behaves exactly as Arduino. So if you program it with Arduino firmware you can have your own small footprint Arduino.
The best part is that you don't need any external software as a loader. You can actually use Arduino IDE as a firmware loader after you define Attiny chip on Arduino IDE.
Have you ever made a project with Arduino and you loved it very much?
Have you ever felt for some project that it deserves to be built on a decent PCB, packaged in a robust enclosure and shown to the whole world? You may be an Arduino enthusiast and try a project everyday with your favorite board. But hey ... You only have this single Arduino board that you got for $10 and you still want to try all those projects. You also have to make all those jumper wires look like spaghetti. What's the solution for this situation? The only solution for this is first by trying your design and prototyping it on your normal Arduino board. And then after the designing and refining process you transfer your design to a practical circuit using normal electronics based on the code you've just developed. So how can you use your Arduino code developed for Arduino Uno board of $10 to those ATtiny chips coasting $2?
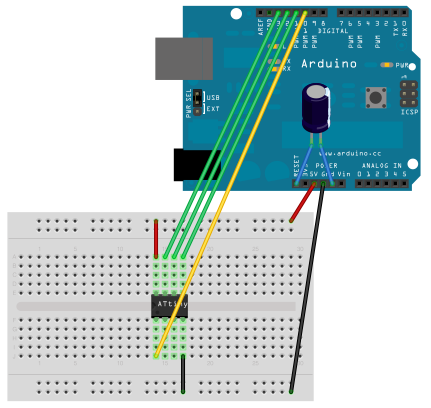
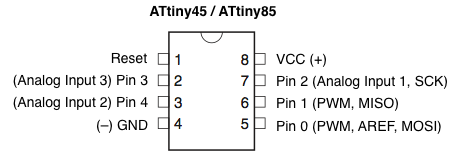
Here is the solution. In this post you'll learn how to load Atiny with Arduino code using Arduino board as a programmer.
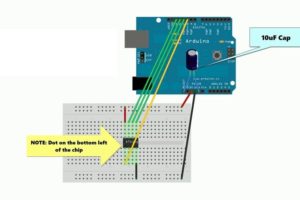
This is very cool and has many advantages... 1 .You make your design more cost effective as you are using lower priced chips(if you already need only short number of input output pins. 2 .Your design is size efficient as you make it smaller and more practical. 3 .Your design becomes permanent on its own PCB. 4 . No need for new code or software as you are already using code you've just developed for Arduino board. 5 . No need for special programming circuits and loaders as you use only Arduino board as a programmer and Arduino IDE as the software loader. So let's see how this is done. This project is based on the High-Low Tech Program tutorial from MITthat describes in detail how to program ATtiny 45/85 with Arduino.





![A Trip To Siwa Oasis: Tourist guide to an Egyptian Oasis by [ElSakhawy, Sara M.]](https://images-na.ssl-images-amazon.com/images/I/51-IGAzLKML.jpg)
![The Ultimate travel bag list by [ Elskhawy, Sara M.]](https://images-na.ssl-images-amazon.com/images/I/51OlVgqIcwL.jpg)
![Why to Travel?: Travel Like an Insider by [M., Sara]](https://images-na.ssl-images-amazon.com/images/I/51BsVhmk3ZL.jpg)
![3 Easy steps to plan your trip: Travel Like an Insider by [Elskhawy, Sara M.]](https://images-na.ssl-images-amazon.com/images/I/51GRc%2BnSxAL.jpg)
![Solar Artwork: How to Make Your Own Solar Masterpiece by [Ebeed, Ahmed]](https://images-na.ssl-images-amazon.com/images/I/51wT6i0RXNL.jpg)
![Backyard Wind Turbines: Harness wind power with simple and fun projects by [Ebeed, Ahmed]](https://images-na.ssl-images-amazon.com/images/I/51JEcdMP8JL.jpg)
