Why
ESP8266 is a smart solution for many IoT projects indeed. It's so cheap and powerful that you can start prototyping and making your own products quickly.ESP8266 is based on the ARM processor and Arduino compatible. It also has its own Wifi transceiver.
So you can use it as a stand alone Arduino board with Wifi capability and you can also use it as an Arduino Wifi Shield.
The problem is when you get the AI-Cloud inside version of ESP8266 you need to Firmware Update it before using the AT commands.
This means that you can use it only as a standalone Arduino board before the update.
But to be able to use it as an Arduino Wifi Shield with AT command you have to update the firmware.
Got it ?
Components
Arduino
ESP8266
How
Connections
ESP8266 -- Arduino
VCC 3.3V
CH_PD 3.3V
GPIO2 3.3V
GND GND
GPIO0 GND
TX TX
RX RX
Circuit
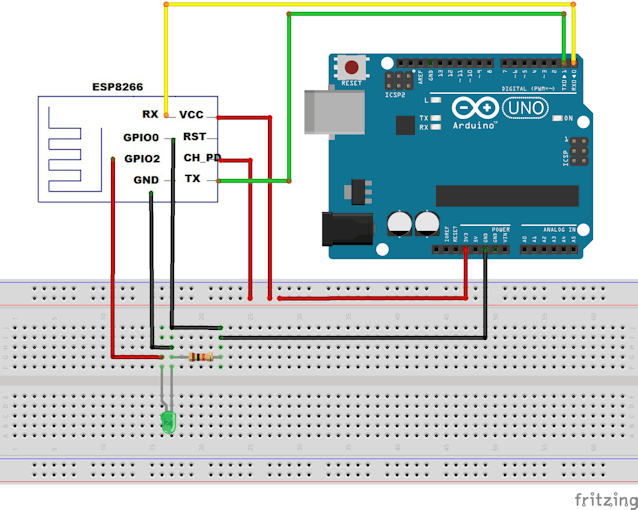
Source: Arduino Website

![A Trip To Siwa Oasis: Tourist guide to an Egyptian Oasis by [ElSakhawy, Sara M.]](https://images-na.ssl-images-amazon.com/images/I/51-IGAzLKML.jpg)
![The Ultimate travel bag list by [ Elskhawy, Sara M.]](https://images-na.ssl-images-amazon.com/images/I/51OlVgqIcwL.jpg)
![Why to Travel?: Travel Like an Insider by [M., Sara]](https://images-na.ssl-images-amazon.com/images/I/51BsVhmk3ZL.jpg)
![3 Easy steps to plan your trip: Travel Like an Insider by [Elskhawy, Sara M.]](https://images-na.ssl-images-amazon.com/images/I/51GRc%2BnSxAL.jpg)
![Solar Artwork: How to Make Your Own Solar Masterpiece by [Ebeed, Ahmed]](https://images-na.ssl-images-amazon.com/images/I/51wT6i0RXNL.jpg)
![Backyard Wind Turbines: Harness wind power with simple and fun projects by [Ebeed, Ahmed]](https://images-na.ssl-images-amazon.com/images/I/51JEcdMP8JL.jpg)

Check our books on Amazon:

Learn By Making: Embedded Systems Tutorial for Students and Beginners