Embedded systems design, Microchip PIC , Microcontroller , Electronics , Software , Computer , PC,Embedded Systems in Egypt , Microcontroller companies in Egypt , Microcontroller Tutorial for beginners, Microchip Microcontrollers tutorial , Microcontrollers made easy, Microcontroller DIY, DIY,embedded systems,embedded system , open source embedded software,list of embedded systems companies in Egypt, Quadcopter , Embedded Systems components in Egypt , Embedded Systems Components Stores in Egypt
Today I searched for the existence of Arduino in the world of Aviation and guess what I have found.. I found many websites and projects that take opensource aviation seriously.
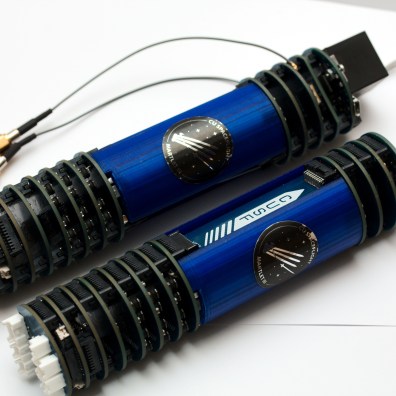
Here is a Cambridge postgraduate student who helped design a modular opensource rocket avionics system that consists of modular Disc-Shaped PCB stacks.
This is an open source car trip computer based on the popular Arduino platform. It calculates trip information such as fuel consumption, cost, remaining fuel, miles per gallon, miles per tank and also displays OBD parameters. OBDuino.ca It first started as of 2008 based on the MPGuino project to get an open source platform for hobbyists to connect to the OBD standard.
This day I'm using the speech recognition module with Arduino UNO. My wife has brought me this Arduino Module as my birthday gift. I'll show you how it can be used.
It can be connected to Arduino or to any other Microcontroller through serial port.
It can also be connected to the standard PC through its serial port but through a TTL converter. Since a standard PC serial port sends and receives RS232 signals (+12v and -12 v) but this module handles TTL signals ( 0 and +5 v )
You can control this module through HEX Format commands or through Arduino libraries associated with it.
First, I had to configure it using USB port in my laptop through this FOCA circuit which converts USB signals to TTL signals.
Then I could use Arduino libraries to initialize the module and load it with speech commands.
The module can store up to 80 voice commands. Then it can differentiate between each one and send signals to Arduino upon command recognition.
Note: Make sure you connect the Clock PIN to the digital PIN 3 on the Arduino. Otherwise the interrupt, and therefore the whole library, won't work. In this project, we used the The PS2Keyboard library. Usage: This is sample code; #include #define DATA_PIN 4 PS2Keyboard keyboard; void setup() { keyboard.begin(DATA_PIN); Serial.begin(9600); Serial.println("hi"); delay(1000); } void loop() { if(keyboard.available()) { byte dat = keyboard.read(); byte val = dat - '0'; if(val >= 0 && val <= 9) { Serial.print(val, DEC); } else if(dat == PS2_KC_ENTER) { Serial.println(); } else if(dat == PS2_KC_ESC) { Serial.println("[ESC]"); } }
The best part is that using this configuration uses only the power of Raspberry Pi ~ 4 watts plus the power of USB ASIC Miner ~ 2.5 watts. Which is a much lower power of the PC or other ASIC Miner.
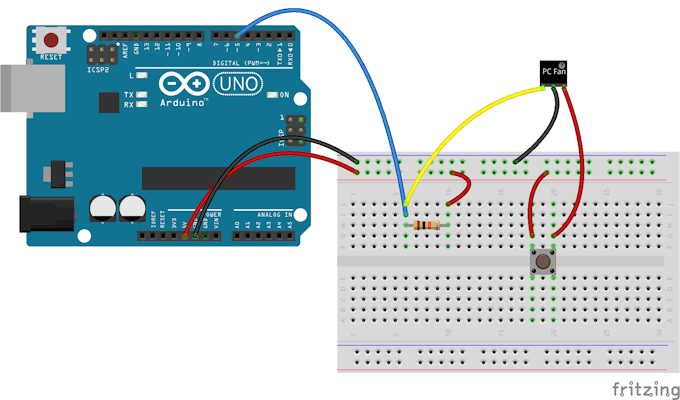
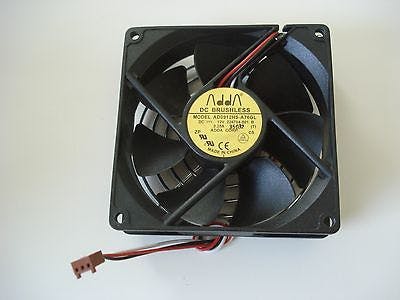
You can use an Old PC Fan as a wind sensor as in this project. Yes, you can make an easy anemometer using Arduino and a PC Fan.
In this project, a 3 wire PC fan is used. The third wire comes from a Hall Effect sensor that measures the fan speed.
As the fan rotates, the Hall Effect sensor produces pulses.
The results are sent to the serial monitor.
Here is the code that does the job:
#include#include"FanMonitor.h"// ***// *** Pins// ***#define FAN_MONITOR_PIN 5// ***// *** Define the FanMonitor instance to monitor// *** the 3-wire fan.// ***FanMonitor_fanMonitor=FanMonitor(FAN_MONITOR_PIN,FAN_TYPE_BIPOLE);voidsetup(){// ***// *** Initialize the serial port.// ***Serial.begin(115200);// ***// *** Initialize the fan monitor.// ***_fanMonitor.begin();}voidloop(){// ***// *** Get the fan speed.// ***uint16_trpm=_fanMonitor.getSpeed();// ***// *** Print the speed to the serial port.// ***Serial.print("Speed = ");Serial.print(rpm);Serial.println(" RPM");// ***// *** Delay 1 second.// ***delay(1000);}
I thought of something a little bit different.
I've managed to make a PC Fan wind Turbine by removing the PC Hall Effect sensor and electronic commutator IC and connecting the terminals to the Fan winding.
I found this topic that uses Microchip PIC16F84A Microcontroller as a One Bit Sound recorder and reproducer. The sound is recorded and regenerated using BTc (Binary Time Constant) algorithm.
The algorithm is designed to be Microcontroller friendly with the minimum Software and Hardware resources.
It's really impressive how you can use only one bit to reproduce digitally recorded sound using simple hardware with small Microcontroller such as PIC16F84A or any other Microcontroller.
I've previously thought of making a capacitive touch sensor that works as touch switch using the PIC 16F84A Microcontroller. I had a lamp that works using capacitive touch as a switch and it gave me the idea. When I worked with the microcontroller and there was some error or bad connection in hardware circuit I noticed that the microcontroller showed irregular behavior during touching it when reading zeros and ones inputs to the GPIOs. Here's how I got the idea of using the microcontroller as a touch sensor. I've tried to make the circuit and code it myself but I had unreliable results. I thought that the idea was wrong and would never work. When I searched for it online I found a video showing how it worked so good. I wanted to share it with you. I found it on this blog: http://diytronics.blogspot.com.eg/2011/05/capacitive-touch-sensor-for-pic16f84a.html I'll try it and will make some modification to it. I'll also add a photo of my own circuit.
Here is the basic C code that does the job int freqcapsense(){ unsigned int avg; unsigned int current=0; unsigned int thresh=29; unsigned int trials=10; while(trials>0){ TRISA=0b0; RA0=1; delay(); TRISA=0b1; while(RA0==1){current++;} trials--; avg=(avg+current)/2; } if((current-avg)>thresh){return 1;} else{return 0;} //return current; }
Here is a video from the maker
The idea is very simple and straight forward. The code can be applied to any microcontroller with this C language code. Thank you for reading.


![Embedded Systems, Electronics: My Projects Collection From Instructables by [Ebeed, Ahmed]](https://images-na.ssl-images-amazon.com/images/I/51TB2XHdvSL.jpg)
![PC Fan Wind Turbine: How to turn an old PC Fan into a small wind turbine the easy way by [Ebeed, Ahmed]](https://images-na.ssl-images-amazon.com/images/I/51cjinFtMYL.jpg)