In this post I found this instructable that makes a beautiful yet easy useful toy for your kids.
Today I found an Arduino controlled model train that you can move using your phone.
We have seen how it's so easy to control devices using Arduino and Bluetooth module.
This projects implements that idea.
It uses Arduino Nano as a controller and HC-06 Bluetooth module to connect to the smartphone.
Then the train is driver by the L293D H-Bridge.
Components
Arduino Nano
HC-06 Bluetooth Module
L293D H-Bridge
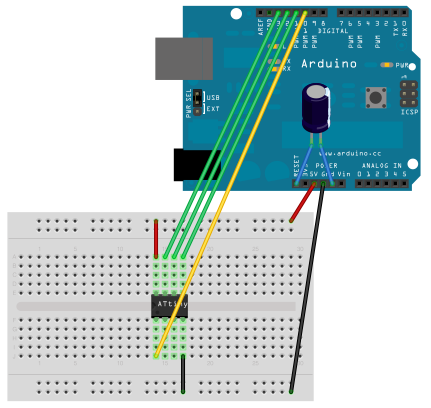
Connections
Circuit
Code
// ARDUINORAILMAKET.RU
// SimpleСmdStation.ino
// 05.02.2017
// Author: Steve Massikker

//// GPIO PINS ////

// L298
#define ENA_PIN 3
#define IN1_PIN 4
#define IN2_PIN 5

//// VARIABLES ////
boolean stringComplete = false;
String inputString = "";


void setup() {

  // Initialize Serial
  Serial.begin(9600);
  inputString.reserve(16);

  // Initialize Motor Driver
  pinMode(ENA_PIN, OUTPUT);
  pinMode(IN1_PIN, OUTPUT);
  pinMode(IN2_PIN, OUTPUT);

}

void loop() {

  if (stringComplete) {

    // ----------- START COMMAND PARSING ----------- //

    //THROTTLE

    if (inputString.charAt(0) =='t') {
      if (inputString.charAt(1) =='0') {
        analogWrite(ENA_PIN, 0);
      }
      if (inputString.charAt(1) =='1') {
        analogWrite(ENA_PIN, 80);
      }
      if (inputString.charAt(1) =='2') {
        analogWrite(ENA_PIN, 100);
      }
      if (inputString.charAt(1) =='3') {
        analogWrite(ENA_PIN, 150);
      }
      if (inputString.charAt(1) =='4') {
        analogWrite(ENA_PIN, 200);
      }
      if (inputString.charAt(1) =='5') {
        analogWrite(ENA_PIN, 255);
      }
    }

    // DIRECTION

    if (inputString.charAt(0) =='d') {
      if (inputString.charAt(1) =='r') {
        digitalWrite(IN1_PIN, HIGH);
        digitalWrite(IN2_PIN, LOW);
      }
      if (inputString.charAt(1) =='f') {
        digitalWrite(IN1_PIN, LOW);
        digitalWrite(IN2_PIN, HIGH);
      }
      if (inputString.charAt(1) =='s') {
        digitalWrite(IN1_PIN, LOW);
        digitalWrite(IN2_PIN, LOW);
        analogWrite(ENA_PIN, 0);
      }
    }

    //TEST

    if (inputString.charAt(0) =='j') {
      if (inputString.charAt(1) =='a') {
        digitalWrite(LED_BUILTIN, HIGH);
      }
      if (inputString.charAt(1) =='b') {
        digitalWrite(LED_BUILTIN, LOW);
      }
    }

// ----------- END COMMAND PARSING ----------- //

inputString = "";
stringComplete = false;

  }
}

// ----------- FUNCTIONS ----------- //

void serialEvent() {
  while (Serial.available() ) {
    char inChar = (char)Serial.read();
    inputString += inChar;
      if (inChar == 'z') {
      stringComplete = true;
    }
  }
}


 enthusiast and you want to make your own Arduino
 .
.


![A Trip To Siwa Oasis: Tourist guide to an Egyptian Oasis by [ElSakhawy, Sara M.]](https://images-na.ssl-images-amazon.com/images/I/51-IGAzLKML.jpg)
![The Ultimate travel bag list by [ Elskhawy, Sara M.]](https://images-na.ssl-images-amazon.com/images/I/51OlVgqIcwL.jpg)
![Why to Travel?: Travel Like an Insider by [M., Sara]](https://images-na.ssl-images-amazon.com/images/I/51BsVhmk3ZL.jpg)
![3 Easy steps to plan your trip: Travel Like an Insider by [Elskhawy, Sara M.]](https://images-na.ssl-images-amazon.com/images/I/51GRc%2BnSxAL.jpg)
![Solar Artwork: How to Make Your Own Solar Masterpiece by [Ebeed, Ahmed]](https://images-na.ssl-images-amazon.com/images/I/51wT6i0RXNL.jpg)
![Backyard Wind Turbines: Harness wind power with simple and fun projects by [Ebeed, Ahmed]](https://images-na.ssl-images-amazon.com/images/I/51JEcdMP8JL.jpg)